February 11, 2021 | Posted by MICRO
With the growing concern about mold damage and associated health problems, inspectors are becoming increasingly vigilant in checking for areas of moisture within the confines of the building envelope. Weather related damage and flooding, and subsequent mold growth, have also escalated the need for tools that can facilitate fast and accurate moisture investigations.
There are a number of areas where moisture can accumulate that are often overlooked in typical inspection processes, or require extensive damage to the property to find them. That is why many are turning to thermal imaging as part of their building inspection regimen.
Using infrared cameras (or thermal imagers) to detect moisture and building failures is a relatively new but rapidly growing practice in inspection and insurance circles. In the past, infrared technology has successfully been used to detect roof failures as well as in the fire and water restoration industry.
As infrared cameras become more readily available and affordable, they are quickly being introduced into what is often referred to as “building forensics investigations”. With the technology available today, building industry contractors can combine thermal imaging with their building inspection skills to make more meaningful and accurate assessments and have the added benefit of expanding their business.
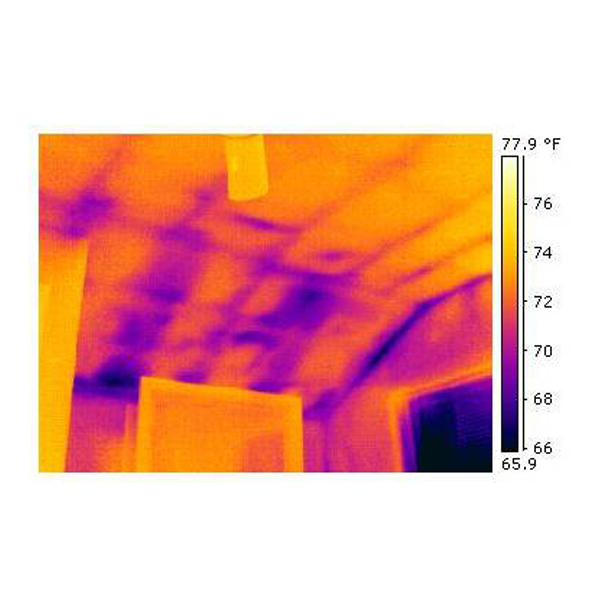
Many insurance carriers for their part have now accepted the use of thermal imaging to identify moisture in interior walls. With thermal images, they can better detect water damage, reducing unforeseen conditions and later requests for more abatement. A thermal imager can show the presence of water below a surface because of properties such as heat capacitance which is the normal method of choice when looking for failures in flat or low slope roofs. The Evaporative Cooling effect is usually the most powerful indicator when moisture gets into studs, insulation and other interior wall components.
Here are some basics you should know about thermal imaging inspection processes and best practices for anyone interested in adding thermal imaging to their service offerings.
Thermal imaging in building forensic investigations
One of the most common applications for thermal imaging today is forensic investigation. This is the process of discovering building failures – whether it is for a home owner complaining about a roof leak, or for collecting data for a lawsuit. Typical areas where defects can be found include low sloped roofs, electrical problems, plumbing or HVAC failures, insulation failures or water intrusion from any number of failing exterior components.
There are many components of a forensic investigation relating to building failure or moisture problems that could use a combination of traditional inspection techniques and infrared cameras. While infrared cameras may not be able to answer all your questions, it can save considerable time and expense for the building owner, and help to pinpoint problems more quickly and more accurately.
By way of example, consider a building owner who notices water on the carpet near a window. Traditional investigative methods might include “tracking” with either an invasive moisture meter or a newer non-invasive moisture meter. This method would try to determine if the water is coming through the wall, from the window, or running down the wall cavity from some other penetration location.
Eventually this would require some means of invasive investigation: for example, cutting open drywall to try and find the leak; opening exterior envelopes to look at flashing detail; and then adding water in order to duplicate the behavior.
With an infrared camera, you can quickly and non-invasively zero in on the probable area to easily identify the anomalies created by evaporative moisture cooling. In the carpet example above, if the water was coming from the roofline or some other ceiling transition area, you would see the anomaly either in multiple locations or as a continuous anomaly from ceiling to floor. Ultimately the leak investigation may still require invasive action, but the infrared camera gets to that location much quicker and with less intrusion to the building envelope.
Framing a moisture detection investigation
Often an infrared inspection request comes in after the fact, so you aren’t able to see the problem at its optimal condition. When that happens, it may be necessary to reintroduce water to the probable affected area. Before you start however, be prepared to answer a few questions that your customer may have. Some of the most commonly asked questions include:
- What if the leak dries before you are scheduled?
- Can you only conduct IR investigations after it rains?
- Can it see through anything (concrete, stucco, siding)?
- How long does it take?
- How much does it cost?
At the same time, you should ask the following questions of the occupant:
- How old is the building? (This gives an idea of the type of failure.)
- When did you first notice a problem? Was it during a rainstorm? Was it a hard rain? Do you only notice the problem after many days of rain?
- If it is an exterior wall, and rain is not involved, is the landscaping running against the same wall? Is there exterior staining from sprinklers?
- Is this a multiple-story unit? Is it directly below a bathroom or kitchen?
- What kind of access is around the affected area? (i.e. is this a 3 to 4 story building?)
- Does it have extensive landscaping?
Have you conducted any repairs recently? (e.g. reroofing, painting, HVAC etc.).
The history you learn about the building will direct you to the area for starting the water test. Often it is necessary to speak with the actual resident and, in some cases, neighbours who live above or adjacent to the property.
Beginning the investigation and water test
The next step is to prepare the interior to minimize any further damage and document the affected area in its existing “before test” condition using digital and thermal photographs accompanied by a brief description.
To reintroduce water to an affected area, always start at the bottom and work your way up, unless evidence from the preliminary investigation shows moisture coming from above (i.e. the roof and ceiling are the affected areas).
Always document the start and stop times and move the water to each new location in eight to ten minute increments. You should not have to exceed 30 to 45 minutes of water testing on one specific area.
Once you have duplicated the leak, stop testing in that location. However, continue up the exterior wall to confirm there are not multiple locations. Take notes or voice record the steps you are taking and a brief description of every thermal photo. This is important since digital photographs may be easily identifiable, thermal photos may not make sense later without the notes. (Fluke thermal imagers offer IR-Fusion® dual digital thermal pictures on screen, to take care of this problem. Some also allow you to attach voice recordings to saved images.)
Weather watching for success
It is also important to pick the optimum time for testing and to maintain proper temperature control. Keep in mind that the greater the span in temperature from outside to inside the building envelope, the better the thermal results. To ensure a successful thermal test therefore, adjust your investigation to accommodate the weather conditions. For example, if the weather is very cold outside, manipulate the temperatures of the building’s interior temperature by turning up the heat.
A warm/hot climate is excellent for thermal investigations, since air conditioning is cooling the building interior. The water used in testing also tends to be cooler, creating greater variance in temperature and therefore generating better thermal images.
Exteriors such as stucco are more porous, absorbing and retaining moisture, providing better exterior shots than siding, which hides water behind the thick planks. You can also use hot water on a cold exterior, but it is more difficult to apply enough to locate the problem.
Count on building industry experience
Even when you pinpoint areas of concern, it doesn’t hurt to talk to the experts. Anomalies in building envelopes may appear fairly easily, but if you don’t have construction experience, consider teaming up with a construction expert to help interpret the results. Refrain from saying too much on the spot until you verify each location. Save comments for the report, since any spoken comments can easily be misinterpreted by the lay person or homeowner, resulting in problems later. Lastly, don’t forget to leave the residence in the same or better condition than before you arrived.
As the interest in thermal imaging for detecting moisture damage increases, now is the time for technicians to get up to speed on the technology and its uses. It will not only allow you to expand you offerings to customers, it will also help to minimize damage to existing property and save you hours of time – with better results to show for it.